Welcome
Welcome to the INTEGRRA User Guide. The purpose of this manual is to familiarize users with the functions and features of the document and task management system in detail.
The information in this section is intended for users who administer the system and whose role in the system is "administrator" (if you do not administer the system and have a role other than "administrator", you can skip this section). You will most likely be working with the Integra document management system for the first time, so we highly recommend that you familiarize yourself with all the information provided in this section. The Integra team recommends starting fresh with the system using the methodology we have provided.
In order to start working successfully and add all the desired employees to your company account, you need to follow certain steps and create in the system in order:
- Divisions.
- User duties.
- Add new users.
- Registries and correctly configure their settings.
- Registers' cases and correctly configure their settings (creating registers' cases is not mandatory in order to start successfully working with Integra).
If you already have created registers in your company account and most or at least part of the employees are added to the system, you can start work and create or register documents, perform other functions. Before starting to work with the system, it is important to master the most relevant functions of the system, which are usually slightly different for each employee according to their system role. The Integra team recommends familiarizing yourself with the instructions below, which will help every employee to understand the system's functions faster and easier and to work successfully with the system:
 You or employees cannot see the documents in the system.
You are correctly logged in to your company account, but still do not see the documents you want to see? A common question faced by customers. The answer is quite simple - be sure to check and ask a colleague with an administrator role to add you to the appropriate registry settings that contain the necessary documents. Depending on whether you want to search for documents or whether you want to create and register documents in a specific register, the administrator must add you to the following points:
You or employees cannot see the documents in the system.
You are correctly logged in to your company account, but still do not see the documents you want to see? A common question faced by customers. The answer is quite simple - be sure to check and ask a colleague with an administrator role to add you to the appropriate registry settings that contain the necessary documents. Depending on whether you want to search for documents or whether you want to create and register documents in a specific register, the administrator must add you to the following points:
- Register a document - link to the instruction.
- Create a document - link to instructions.
- Create a task - link to instructions.
- Document search - link to instructions.
You or employees cannot see the documents in the system.
You are correctly logged in to your company account, but still do not see the documents you want to see? A common question faced by customers. The answer is quite simple - be sure to check and ask a colleague with an administrator role to add you to the appropriate registry settings that contain the necessary documents. Depending on whether you want to search for documents or whether you want to create and register documents in a specific register, the administrator must add you to the following points:
- Individuals, divisions that see the registry;
- Individuals, divisions conducting a search in registry.
In order to create a new register and to see existing company registers and edit their settings, it is recommended to follow the sequence of clicks in the screenshot below. After making the selections shown, you will be able to create a new registry. Below you will find a step-by-step guide to registry settings so you can successfully create a new registry and know what each registry setting means. We emphasize that only users with the administrator role can create registries and edit existing settings.
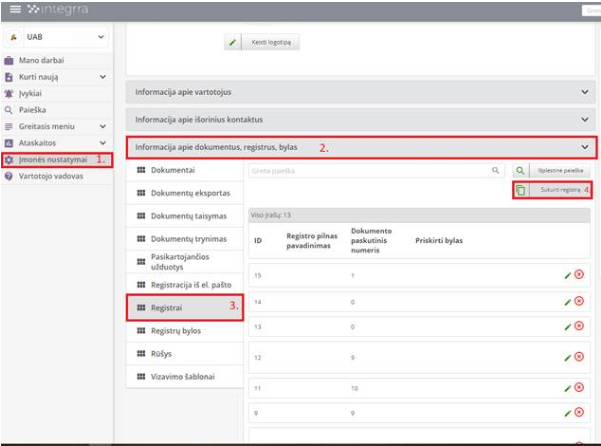 After clicking on the item marked with the fourth number "Create a register", the following window will open:
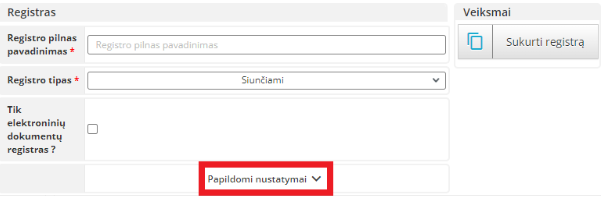 Register full name - enter the full name of the registry, which will be visible when creating or registering a new document, as well as in the document card and search.
Register type - you can choose from three register types: outgoing, incoming and internal. It is up to you to decide which documents will be placed in this registry, so select the appropriate type of registry. After choosing the type Incoming - you can use the Create a document function and sign it with internal or by eSignature. After selecting the type Outgoing, you can select the Register a document function and sign the registration with internal or by eSigniture. By selecting the type Internal - you will be able to use functions Create a document and Register a document and sign it with internal or eSigniture.
Only eSigned document's register? - After activating this setting, the system will allow creating exclusively eSigned documents in the registry. If you do not activate this setting, in the registry before creating a document, you can choose which signature will be used to sign the document that you are creating.
Click on the red defined "Additional settings" box to open additional registry settings. This step is necessary to fully create the registry.
Individuals, divisions that see the registry - users who will be added to this point will be able to see and select the registry when creating or registering a new document. The essence of this and the next point is the granting of rights and access to the created registry to selected users. People who are not added will not be able to see the registry when creating or registering new documents. If no person is added in this setting, by default, this registry is available to create and register documents for all registered users of the company.
Individuals, divisions conducting a search in registry - works similarly to the setting above. In order for users to be able to browse the documents of this register and find them through search, they should be added to this point. As in the previous setting, if no user is added to this parameter, by default, all registered users can search for documents in this registry.
Registry short name - we recommend that you enter the same name as the registry's full name, which you filled in at the very beginning, or for convenience, enter a registry name abbreviation.
Registry number - indicates the registry’s number, otherwise known as the document abbreviation, which will be visible in the system and in the documents when you register them. As an example, if you have a register called "Invoices", its number could be INV1 or simply INV. Everything depends on the internal procedure of the company or institution. After registering a document in this register, it would receive a number INV (its series number in the registry).
Type - this is the division of registries into blocks of types, to which, after assigning a registry, it will be displayed in a structured list during search and selection when creating a new document.
Document's term in days - when creating a new document, you can always choose a document deadline. When you select a term using this registry feature, it will appear by default in every document that is created in this registry.
State after creation - when a new document is created, the status of the document is automatically determined in this registry. You can choose the desired status after creating the document in this registry. If you will use the register for documents that require a signature or visa, we recommend leaving the status "Project". If the documents do not need to be handed over for signature or visa, select the status "Waiting for registration". If the status "Registered" is selected, the created document will be automatically registered, and if the status "Done" is selected, after it is created, it will already be read as fully completed.
State after registration - after registering a new document in this registry, the status of the document is automatically determined. You can choose the desired status after registering the document in this registry. We recommend leaving the status "Registered" if you want the document to go to the recipient's jobs main page. If the status "Done" is selected, the document will not be sent to the recipient's jobs main page, but will be available through the system search.
Secretary - an option to specify the secretary of the document. The document secretary performs the function of document registration, i.e. if the register is of the internal or outgoing type, after signing, the document will go to the secretary’s jobs main page, if one is specified. If the secretary is not specified, the creator of the document will be responsible for registering the document in the registry.
Last number of the document - you can enter the selected number, from which the numbering of the document will continue, i.e. if you have started working with the system since the middle of the year, but you already have 50 documents registered in the paper version, and you do not want to bring them into the system, but to continue further document registration and creation in the system, then you should enter the last number - 50. The next document to be created will be 51.
Registry template - template on which the document number is created. By default it is set to show $JOURNAL-$NR ($JOURNAL - Register number, $NR - Document series number). It is possible to supplement the desired rendering with several more functions such as:
-$YEAR - Shows the year the document was created,
-$MONTH - Shows the month of creation of the document,
-$DAY - Shows the date of creation of the document.
You can choose as many displayed formats as you want. Important - there must be no space after writing each function, they must be separated by a hyphen "-". For example, if you want the document to be displayed with all optional functions, then you need to write "$JOURNAL-$NR-$YEAR-$MONTH-$DAY" (without quotes).
Recipient(s) by default - option to specify the default recipients of the document. When creating or registering a document in this registry, you will automatically see all entered recipients in the "Recipient" field using this function.
Sender(s) by default - option to specify the default senders of the document. When creating or registering a document in this registry, you will automatically see all entered recipients in the "Sender" field using this function.
Approver(s) by default - Option to specify default approvers/endorsers for internal or outgoing documents. The same principle of operation as the functions mentioned above. It is important to note that ONLY users registered in the company account can be visa approvers.
Signatories by default – Option to specify default signatories for internal or outgoing documents. The same principle of operation as the functions mentioned above.
Integration code - filled in when integrating with other external systems. Filling in this field is intended only for employees of UAB Idamas, so we highly recommend leaving it blank.
Secret? - possibility to indicate that the confidentiality mark will always be applied when creating a document. This means that the media and information contained in the document card will be visible only to those users who have the rights to see them (i.e. are participants in the document management) after opening the document card. If you do not have the specific rights and are not a participant of the document management when you try to open the document card, you will notice a message that the content of the document is confidential.
Is versioning of the documents used? – when editing a document, new versions of the documents will be created, where changes to the original document can be seen. For example, if you edit a document 5 times, the system will create 6 different versions of the document, which will show all the edits and who made them. If the setting is unchecked, all edits will be overwritten onto the original document.
Allow to register retroactively ? - possibility to register documents retroactively in this registry.
Is numbering continued after the end of the year? - possibility to continue or to restart document numbering in this registry after the end of the year.
Is used? - the ability to indicate whether the registry is currently in use or not. If this setting is not checked, the register will not be among the selectable registers before creating the document. It is recommended to use this function so that you do not delete unnecessary registries, you can simply make it unused and make it usable again if necessary.
Allow creation without any attachments ? - the ability to create a document without attaching file media. We do not recommend enabling this feature, as users occasionally create a document without media without even intending to, as a message that media is not attached is not displayed when creating a document.
Assign cases - possibility to assign cases to the registry. When creating or registering a new document in the registry, it is possible to split the registry into different cases, where the files will be stored.
Register full name - enter the full name of the registry, which will be visible when creating or registering a new document, as well as in the document card and search.
Register type - you can choose from three register types: outgoing, incoming and internal. It is up to you to decide which documents will be placed in this registry, so select the appropriate type of registry. After choosing the type Incoming - you can use the Create a document function and sign it with internal or by eSignature. After selecting the type Outgoing, you can select the Register a document function and sign the registration with internal or by eSigniture. By selecting the type Internal - you will be able to use functions Create a document and Register a document and sign it with internal or eSigniture.
Only eSigned document's register? - After activating this setting, the system will allow creating exclusively eSigned documents in the registry. If you do not activate this setting, in the registry before creating a document, you can choose which signature will be used to sign the document that you are creating.
Click on the red defined "Additional settings" box to open additional registry settings. This step is necessary to fully create the registry.
Individuals, divisions that see the registry - users who will be added to this point will be able to see and select the registry when creating or registering a new document. The essence of this and the next point is the granting of rights and access to the created registry to selected users. People who are not added will not be able to see the registry when creating or registering new documents. If no person is added in this setting, by default, this registry is available to create and register documents for all registered users of the company.
Individuals, divisions conducting a search in registry - works similarly to the setting above. In order for users to be able to browse the documents of this register and find them through search, they should be added to this point. As in the previous setting, if no user is added to this parameter, by default, all registered users can search for documents in this registry.
Registry short name - we recommend that you enter the same name as the registry's full name, which you filled in at the very beginning, or for convenience, enter a registry name abbreviation.
Registry number - indicates the registry’s number, otherwise known as the document abbreviation, which will be visible in the system and in the documents when you register them. As an example, if you have a register called "Invoices", its number could be INV1 or simply INV. Everything depends on the internal procedure of the company or institution. After registering a document in this register, it would receive a number INV (its series number in the registry).
Type - this is the division of registries into blocks of types, to which, after assigning a registry, it will be displayed in a structured list during search and selection when creating a new document.
Document's term in days - when creating a new document, you can always choose a document deadline. When you select a term using this registry feature, it will appear by default in every document that is created in this registry.
State after creation - when a new document is created, the status of the document is automatically determined in this registry. You can choose the desired status after creating the document in this registry. If you will use the register for documents that require a signature or visa, we recommend leaving the status "Project". If the documents do not need to be handed over for signature or visa, select the status "Waiting for registration". If the status "Registered" is selected, the created document will be automatically registered, and if the status "Done" is selected, after it is created, it will already be read as fully completed.
State after registration - after registering a new document in this registry, the status of the document is automatically determined. You can choose the desired status after registering the document in this registry. We recommend leaving the status "Registered" if you want the document to go to the recipient's jobs main page. If the status "Done" is selected, the document will not be sent to the recipient's jobs main page, but will be available through the system search.
Secretary - an option to specify the secretary of the document. The document secretary performs the function of document registration, i.e. if the register is of the internal or outgoing type, after signing, the document will go to the secretary’s jobs main page, if one is specified. If the secretary is not specified, the creator of the document will be responsible for registering the document in the registry.
Last number of the document - you can enter the selected number, from which the numbering of the document will continue, i.e. if you have started working with the system since the middle of the year, but you already have 50 documents registered in the paper version, and you do not want to bring them into the system, but to continue further document registration and creation in the system, then you should enter the last number - 50. The next document to be created will be 51.
Registry template - template on which the document number is created. By default it is set to show $JOURNAL-$NR ($JOURNAL - Register number, $NR - Document series number). It is possible to supplement the desired rendering with several more functions such as:
-$YEAR - Shows the year the document was created,
-$MONTH - Shows the month of creation of the document,
-$DAY - Shows the date of creation of the document.
You can choose as many displayed formats as you want. Important - there must be no space after writing each function, they must be separated by a hyphen "-". For example, if you want the document to be displayed with all optional functions, then you need to write "$JOURNAL-$NR-$YEAR-$MONTH-$DAY" (without quotes).
Recipient(s) by default - option to specify the default recipients of the document. When creating or registering a document in this registry, you will automatically see all entered recipients in the "Recipient" field using this function.
Sender(s) by default - option to specify the default senders of the document. When creating or registering a document in this registry, you will automatically see all entered recipients in the "Sender" field using this function.
Approver(s) by default - Option to specify default approvers/endorsers for internal or outgoing documents. The same principle of operation as the functions mentioned above. It is important to note that ONLY users registered in the company account can be visa approvers.
Signatories by default – Option to specify default signatories for internal or outgoing documents. The same principle of operation as the functions mentioned above.
Integration code - filled in when integrating with other external systems. Filling in this field is intended only for employees of UAB Idamas, so we highly recommend leaving it blank.
Secret? - possibility to indicate that the confidentiality mark will always be applied when creating a document. This means that the media and information contained in the document card will be visible only to those users who have the rights to see them (i.e. are participants in the document management) after opening the document card. If you do not have the specific rights and are not a participant of the document management when you try to open the document card, you will notice a message that the content of the document is confidential.
Is versioning of the documents used? – when editing a document, new versions of the documents will be created, where changes to the original document can be seen. For example, if you edit a document 5 times, the system will create 6 different versions of the document, which will show all the edits and who made them. If the setting is unchecked, all edits will be overwritten onto the original document.
Allow to register retroactively ? - possibility to register documents retroactively in this registry.
Is numbering continued after the end of the year? - possibility to continue or to restart document numbering in this registry after the end of the year.
Is used? - the ability to indicate whether the registry is currently in use or not. If this setting is not checked, the register will not be among the selectable registers before creating the document. It is recommended to use this function so that you do not delete unnecessary registries, you can simply make it unused and make it usable again if necessary.
Allow creation without any attachments ? - the ability to create a document without attaching file media. We do not recommend enabling this feature, as users occasionally create a document without media without even intending to, as a message that media is not attached is not displayed when creating a document.
Assign cases - possibility to assign cases to the registry. When creating or registering a new document in the registry, it is possible to split the registry into different cases, where the files will be stored.
After clicking on the item marked with the fourth number "Create a register", the following window will open:
Register full name - enter the full name of the registry, which will be visible when creating or registering a new document, as well as in the document card and search.
Register type - you can choose from three register types: outgoing, incoming and internal. It is up to you to decide which documents will be placed in this registry, so select the appropriate type of registry. After choosing the type Incoming - you can use the Create a document function and sign it with internal or by eSignature. After selecting the type Outgoing, you can select the Register a document function and sign the registration with internal or by eSigniture. By selecting the type Internal - you will be able to use functions Create a document and Register a document and sign it with internal or eSigniture.
Only eSigned document's register? - After activating this setting, the system will allow creating exclusively eSigned documents in the registry. If you do not activate this setting, in the registry before creating a document, you can choose which signature will be used to sign the document that you are creating.
Click on the red defined "Additional settings" box to open additional registry settings. This step is necessary to fully create the registry.
Individuals, divisions that see the registry - users who will be added to this point will be able to see and select the registry when creating or registering a new document. The essence of this and the next point is the granting of rights and access to the created registry to selected users. People who are not added will not be able to see the registry when creating or registering new documents. If no person is added in this setting, by default, this registry is available to create and register documents for all registered users of the company.
Individuals, divisions conducting a search in registry - works similarly to the setting above. In order for users to be able to browse the documents of this register and find them through search, they should be added to this point. As in the previous setting, if no user is added to this parameter, by default, all registered users can search for documents in this registry.
Registry short name - we recommend that you enter the same name as the registry's full name, which you filled in at the very beginning, or for convenience, enter a registry name abbreviation.
Registry number - indicates the registry’s number, otherwise known as the document abbreviation, which will be visible in the system and in the documents when you register them. As an example, if you have a register called "Invoices", its number could be INV1 or simply INV. Everything depends on the internal procedure of the company or institution. After registering a document in this register, it would receive a number INV (its series number in the registry).
Type - this is the division of registries into blocks of types, to which, after assigning a registry, it will be displayed in a structured list during search and selection when creating a new document.
Document's term in days - when creating a new document, you can always choose a document deadline. When you select a term using this registry feature, it will appear by default in every document that is created in this registry.
State after creation - when a new document is created, the status of the document is automatically determined in this registry. You can choose the desired status after creating the document in this registry. If you will use the register for documents that require a signature or visa, we recommend leaving the status "Project". If the documents do not need to be handed over for signature or visa, select the status "Waiting for registration". If the status "Registered" is selected, the created document will be automatically registered, and if the status "Done" is selected, after it is created, it will already be read as fully completed.
State after registration - after registering a new document in this registry, the status of the document is automatically determined. You can choose the desired status after registering the document in this registry. We recommend leaving the status "Registered" if you want the document to go to the recipient's jobs main page. If the status "Done" is selected, the document will not be sent to the recipient's jobs main page, but will be available through the system search.
Secretary - an option to specify the secretary of the document. The document secretary performs the function of document registration, i.e. if the register is of the internal or outgoing type, after signing, the document will go to the secretary’s jobs main page, if one is specified. If the secretary is not specified, the creator of the document will be responsible for registering the document in the registry.
Last number of the document - you can enter the selected number, from which the numbering of the document will continue, i.e. if you have started working with the system since the middle of the year, but you already have 50 documents registered in the paper version, and you do not want to bring them into the system, but to continue further document registration and creation in the system, then you should enter the last number - 50. The next document to be created will be 51.
Registry template - template on which the document number is created. By default it is set to show $JOURNAL-$NR ($JOURNAL - Register number, $NR - Document series number). It is possible to supplement the desired rendering with several more functions such as:
-$YEAR - Shows the year the document was created,
-$MONTH - Shows the month of creation of the document,
-$DAY - Shows the date of creation of the document.
You can choose as many displayed formats as you want. Important - there must be no space after writing each function, they must be separated by a hyphen "-". For example, if you want the document to be displayed with all optional functions, then you need to write "$JOURNAL-$NR-$YEAR-$MONTH-$DAY" (without quotes).
Recipient(s) by default - option to specify the default recipients of the document. When creating or registering a document in this registry, you will automatically see all entered recipients in the "Recipient" field using this function.
Sender(s) by default - option to specify the default senders of the document. When creating or registering a document in this registry, you will automatically see all entered recipients in the "Sender" field using this function.
Approver(s) by default - Option to specify default approvers/endorsers for internal or outgoing documents. The same principle of operation as the functions mentioned above. It is important to note that ONLY users registered in the company account can be visa approvers.
Signatories by default – Option to specify default signatories for internal or outgoing documents. The same principle of operation as the functions mentioned above.
Integration code - filled in when integrating with other external systems. Filling in this field is intended only for employees of UAB Idamas, so we highly recommend leaving it blank.
Secret? - possibility to indicate that the confidentiality mark will always be applied when creating a document. This means that the media and information contained in the document card will be visible only to those users who have the rights to see them (i.e. are participants in the document management) after opening the document card. If you do not have the specific rights and are not a participant of the document management when you try to open the document card, you will notice a message that the content of the document is confidential.
Is versioning of the documents used? – when editing a document, new versions of the documents will be created, where changes to the original document can be seen. For example, if you edit a document 5 times, the system will create 6 different versions of the document, which will show all the edits and who made them. If the setting is unchecked, all edits will be overwritten onto the original document.
Allow to register retroactively ? - possibility to register documents retroactively in this registry.
Is numbering continued after the end of the year? - possibility to continue or to restart document numbering in this registry after the end of the year.
Is used? - the ability to indicate whether the registry is currently in use or not. If this setting is not checked, the register will not be among the selectable registers before creating the document. It is recommended to use this function so that you do not delete unnecessary registries, you can simply make it unused and make it usable again if necessary.
Allow creation without any attachments ? - the ability to create a document without attaching file media. We do not recommend enabling this feature, as users occasionally create a document without media without even intending to, as a message that media is not attached is not displayed when creating a document.
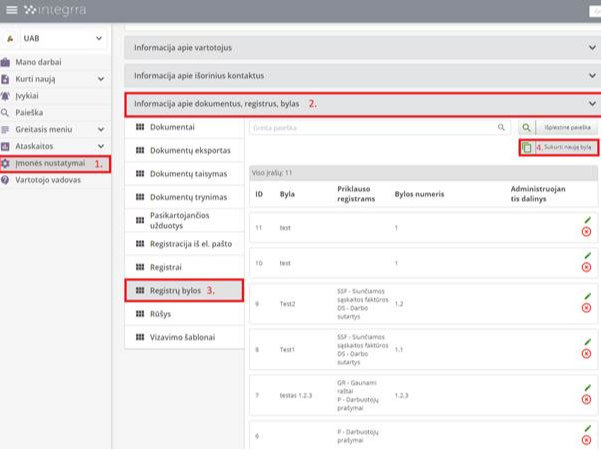
Assign cases - possibility to assign cases to the registry. When creating or registering a new document in the registry, it is possible to split the registry into different cases, where the files will be stored.In order to create a new case and view existing case, we recommend following the sequence of clicks in the screenshot below. After making the selections shown, you will be able to create a new case. Below you will find a step-by-step guide to case settings that will help you successfully create a new case and explain what each registry’s case setting means. When creating cases, you can immediately assign them to already existing registries. The essence of cases is the ability to divide one register into several cases. If the register is divided into cases, if it is selected when creating or registering a new document, it will always be necessary to indicate the case of the register.
 After clicking on the item marked with the fourth number "Create a new case", a form for filling in the settings of the new case being created will open.
Settings in the form and their meaning:
Case – the visible name of the case that will appear in documents, registries, searches, etc.
Belongs to registers - in this setting, you can assign the creation to the desired registry. One case can belong to an unlimited number of registries.
Case number - the case number is indicated, which is included when creating the number of the document to be registered. If the case is added to the register with the number SF1 and the case number is 25, then when registering the document in the register with the following serial number of the registered document is 87, the full document numbering may look like this - SF1-25-87.
Removal from the archive in years - select the number after which case documents will be removed from the archive. You can choose from 1 to 25 years.
Next, click on the item "Advanced settings" to continue the case creation process.
Selected by default? - check this section if you want the case in the registers to be automatically selected when creating or registering a new document, and you don't have to do it manually every time.
Document's term in days - By entering the number of days in this setting, you will select how long the default due date will be for all documents when they are created in this case.
Archiving time in years - select the number after how many years the case documents will be transferred to the archive.
Retention period - choose how long the files will be stored in the system. You can choose permanent storage or specific number of years.
Legislation - if your company has assigned legal acts according to which the cases are described, you can mark that number right here.
Activity - this is the division of cases into activities/types, so the case should be assigned to one of the already created types.
Notes - you can mark notes related to the case or the information you need.
Available in the dossier plan supplement - mark if you have a case under development described in the supplement to the documentation plan.
People, divisions that can see the case - same as in the registers, users who will be added to this setting will be able to see the case in the register when creating or registering a new document. People who are not added will not be able to see the file when creating or registering new documents.
Allow selection when creating/registering a document? - after removing the check mark, when creating or registering a document in the case register, you will not see this case as an option (the case will be inactive). It is necessary to check the box to see the case in the registry as an option to create or register documents.
Administrative unit - select the division that will administer the case. This means that the selected unit will be designated as responsible for the documents that will be registered in the case being created.
After clicking on the item marked with the fourth number "Create a new case", a form for filling in the settings of the new case being created will open.
Settings in the form and their meaning:
Case – the visible name of the case that will appear in documents, registries, searches, etc.
Belongs to registers - in this setting, you can assign the creation to the desired registry. One case can belong to an unlimited number of registries.
Case number - the case number is indicated, which is included when creating the number of the document to be registered. If the case is added to the register with the number SF1 and the case number is 25, then when registering the document in the register with the following serial number of the registered document is 87, the full document numbering may look like this - SF1-25-87.
Removal from the archive in years - select the number after which case documents will be removed from the archive. You can choose from 1 to 25 years.
Next, click on the item "Advanced settings" to continue the case creation process.
Selected by default? - check this section if you want the case in the registers to be automatically selected when creating or registering a new document, and you don't have to do it manually every time.
Document's term in days - By entering the number of days in this setting, you will select how long the default due date will be for all documents when they are created in this case.
Archiving time in years - select the number after how many years the case documents will be transferred to the archive.
Retention period - choose how long the files will be stored in the system. You can choose permanent storage or specific number of years.
Legislation - if your company has assigned legal acts according to which the cases are described, you can mark that number right here.
Activity - this is the division of cases into activities/types, so the case should be assigned to one of the already created types.
Notes - you can mark notes related to the case or the information you need.
Available in the dossier plan supplement - mark if you have a case under development described in the supplement to the documentation plan.
People, divisions that can see the case - same as in the registers, users who will be added to this setting will be able to see the case in the register when creating or registering a new document. People who are not added will not be able to see the file when creating or registering new documents.
Allow selection when creating/registering a document? - after removing the check mark, when creating or registering a document in the case register, you will not see this case as an option (the case will be inactive). It is necessary to check the box to see the case in the registry as an option to create or register documents.
Administrative unit - select the division that will administer the case. This means that the selected unit will be designated as responsible for the documents that will be registered in the case being created.In the main window, on the left side, you can see the menu buttons. After clicking My jobs in the main system window, on the right side, additional options buttons are visible:
- My jobs;
- My monitored;
- All work;
- Work of subordinates;
- Print icon.
- light gray - read, but not yet finished;
- dark gray - unread;
- in red - late.
This menu item is intended for creating new documents, tasks (only users with the role of administrator or manager have the functionality available in this menu item) or events. After expanding this item, users with the employee role will see two sub-items - Create event and Create a document. Users with the registrar role will additionally see the sub-item Register a document. Users with the manager role will additionally see the sub-item Create task. Users with the administrator role will additionally see Create user, Create registry and Create division.
Create event - after clicking Create event, a new window will open where you can enter the text of the event to be published. It is also possible to attach the desired attachment, be it a video material or a text file, and it is also possible to preview how the event will look before publishing it. By ticking the box next to Publish to all, the event will be visible to all registered users of your institution/company. If unchecked, only the person/persons/divisions/groups that are selected will see the event. When everything is done, click Publish to publish your created event.
Create a document - after clicking Create a document, a new system window will open, where you will have to select a registry from the list of registries visible to you, where you will store the newly created document, and you will have to choose the type of signature the document will be signed with (Simple document - a document signed with a simple system signature, which is intended for signing internal documents; Document signed with electronic signature - a document signed with a full-fledged e-signature). After doing this and pressing the Confirm button, you will be redirected to the document card data filling form. Once you've filled it out and created the document, you can continue to manage it as you wish.
Register a document - after clicking on Register a document, a new system window will open, where you will have to select the register to which your document will be registered and you will have to choose the type of the received document (signed with a simple signature or document signed with electronic signature). After selecting the required fields, you will be directed to the form for filling in the data of the received document card. After filling it out, the document will be registered in the system and you can take further actions with it.
Create a task - after selecting this item, you will be directed to the task card data filling form. In it, you will have to indicate the recipient of the task (the task performer), describe the task itself, if there is a need - attach a document or media file related to the task. You will also be able to specify the controller of that task, who will be responsible for checking the correctness of the completed task or providing additional information to the recipient of the task.
Create a user - this option will automatically open the form for creating a new user in the system and after filling the form, an invitation will be sent to the new user to join the Integra system.
Create a registry - this point automatically opens the form of parameters for creating a new registry in the system. After filling it out and saving the summarized settings, a new registry is created in the company account where you can create or register new documents and manage them.
Create a division - this item automatically opens the form for creating a new division in the system, which after filling and saving the settings, the user with the administrator role will be able to assign other users created in the company account.
In this section, you can publish whatever news you want and attach documents or photos that will be visible to all registered users of your company account or only to those users for whom you will set the visibility of the event. The published event window shows the name and surname of the person who published it and how long ago the event was published. Below you can see the option to delete a published event. Only the user who posted it has this option. All employees of the company can see the comments section, the number of people who commented, viewed, followed and liked the event.
After clicking Search, a new window opens where you can search for a document according to various criteria:
- Number
- Journal/Registry
- Title
- Attached files
- Sender
- Receiver
- Author
- Documents older than 30 days are searched by marking them with a check mark.
This menu item is intended to review the statistics of the completed and uncompleted work of company account employees in the system by selecting the desired time period. Also, in this section, you can review the status of the work of your subordinates and see their activity in the system.
Pressing Quick Menu allows you to select its menu settings. In the window that opens, you can mark which options you want to see in the Quick Menu section. You can also add document search filters in this section, which will be initiated by pressing one button and will immediately display a list of relevant documents and/or tasks in the system.
In this section, you can choose from such options for company account reports as:
- Documents;
- Tasks.
- Today
- yesterday
- This week
- This month
- last week
- Past month
- Past and present month
After opening the Company Settings section, you can adjust your company's contact information, create new users and edit existing ones, create new registries, their cases, upload company file templates, give users the appropriate access rights to the necessary documents and manage all the settings of your company account.
This menu section consists of four additional sections that manage the relevant company account information:
- Information about users;
- Information about external contacts;
- Information about documents, registers, files;
- Information about system.
After opening a document that is listed in the My jobs section, you can perform the following actions with the documents, depending on the current system status of the document and the user's system role:
Create assignment - by clicking this button, you can create a task for the desired user, to which the document you see will be linked. This button is only visible to users with the administrator or manager system role and when the document status is Registered or Done.
Mark completed - by pressing this button, you can provide the results of the document’s full completion, which will be recorded in the document card, and after clicking the Mark completed button, the document acquires the status Done and will disappear from the user's My jobs main page, but will be available through the system search, if the user has access rights to the document registry . The button is available only to the specified recipient of the document and the document has the status Registered.
Familiarized - by pressing this button, the user confirms that he has familiarized himself with the content of the document and the user's familiarization status changes in the document card. The document will disappear from the user's My jobs main page, but will be available through system search if the user has access rights to the document registry. The button is available only to the user to whom the document has been transferred to familiarize with and the document has the status Registered.
Send using el. delivery service - by pressing this button, the system allows you to create a shipment letter and send the document through the eDelivery platform, if the recipient specified in the document (external legal entity or individual person) has an active eDelivery box. The button is only available to the document creator when the status of the document is Registered or Completed.
Send to familiarize - by clicking this button, you can indicate to which registered users the document will be transferred to familiarize with its contents. After submitting the document for this action, a new section will be created on the document card where you will see the users’ familiarization status. The button is available when the document status is Registered only to those users with manager or administrator roles.
Send to get visa - by pressing this button, you can specify the users who will endorse a visa for the document and after they submit it, an additional new section will be formed on the document card, where you will see the status of each visa holder. This button is visible to the document creator when the document status is Project.
Send to sign - by clicking this button, you can specify the users to whom the document will be submitted for signing. After submitting the document for signing, an additional new section will be formed in the document card, where you can see the status of each signing user. If the document you are transferring is an eSignature type, with the help of this button, you can indicate external legal entities (if the legal entity is specified as the recipient of the document) or external individual persons to whom you will hand over the document for signature. This button is only visible to the document creator when the document status is Project or Endorsed.
Send back for adjusting - by clicking this button, you can indicate the reason why the document is returned to the document creator for correction, refusing to endorse or sign it. This button is visible to users who are endorsing or signing the document when the status of the document is Transferred for signature or Transferred for endorsement.
Link document - by clicking this button, you can find a document already registered in your company account and link it to the visible document. Once linked, a new section will appear at the bottom of the visible document card where you can switch to view the content of other linked documents and take further action with those documents. This button is visible to the document creator and recipient when the document status is Project, Endorsed, Signed, Registered, or Done.
Create a copy - after clicking this button, the system will direct you to the creation of a new document with the metadata fields which will be automatically filled with identical parameters as the original document.
Print - by pressing this button, you will be able to create a printout of the document card, which you can save as a pdf file.
Edit - by pressing this button, you can edit the document parameters and attach new or remove existing document files. After saving the new editing settings, the status of the document will change to the status set by its registry after creation, and if the document has been given visas or signatures, they will be canceled. This button is only visible to the creator of the document and users with the administrator role.
Send by mail - by clicking this button, you can send the files in the document to an external person by checking the "Send by mail?" checkbox and after entering the email address of said person. This button is visible to the creator of the document and the specified recipient of the document when the status of the document is Registered.
Endorse - by clicking this button, you will put a positive visa on the document and send the document to its creator for further management. This button is visible to the person endorsing the document when the status of the document is Transferred for endorsement.
Endorse with comment - by clicking this button, you will put a positive visa on the document and you can also specify a note about the document or additionally attach a missing or correct document file and send the document to its creator for further management. This button is visible to the person endorsing the document when the status of the document is Transferred for endorsement.
Sign - clicking this button will place your system internal signature on the document and send the document back to its creator for management. This button is visible to the signer when the status of the document is Transferred for signature.
Sign with electronic signature - by pressing this button, you will initiate the signing of the document by eSignature. An additional window will appear in the system, where after selecting the desired signing technology and filling in the necessary information fields, your eSigniturel will be added in the content of the document. This button is visible to the signer when the status of the document is Transferred for signature.
Monitor - by clicking this button, you can add the document to the My monitored section, where you can always follow and review the document through its management process.
Remind - by clicking this button, you can create reminders for yourself to your user's e-mail address about this document awaiting actions.